Saturday, 10 December 2011

Christmas cake #1


It's nearly Christmas time, and that means time for Christmas baking! I have made two Christmas cakes this year for three reasons: 1) I like baking, 2) I wanted to do lots of cake decorating and 3) everyone in my family loves fruit cake. Christmas cake always goes down well. 

I made my cakes back at the end of October as I like giving them time to mature. Normally they stay in the cupboard until about three days before Christmas when I finally get round to marzipanning and icing them, but because part of my cake icing class involved a Christmas project Christmas cake number 1 is now finished.

As usual, I used Delia Smith's recipe from her Complete Cookery Course book, amended like normal to contain the dried fruit I like best! I also omitted the almonds and used fruit juice instead of brandy. Unfortunately I didn't have (or thought I didn't have) any ground mixed spice when making the cake, so I added ginger and nutmeg in its place. I'm not sure what effect this is going to have on the taste, so am curious to taste the cake to find out. I then found out just recently that I did have ground mixed spice after all, it was just hiding at the back of the cupboard! I could have kicked myself for not finding it (I was sure I should have had it since I had obviously made this recipe before!) and am just hoping the cakes taste okay. They smelled good when I unwrapped them to decorate them, so fingers crossed.

I have learned a few tricks for icing the cake now! Any holes in the cake should be plugged with marzipan before putting the layer of marzipan on. In addition, the cake should be placed upside down on the cake board and if the bottom edge of the cake lies just above the board (due to the way the cake is a bit higher in the middle after cooking) put a long rope of marzipan around the base. Then cover the cake in apricot jam, then marzipan.

Once the marzipan has dried, roll out the icing (I used fondant icing rather than royal icing - I'm not keen on the hard royal icing) and then brush the marzipan with either white alcohol or water. Cover the cake in the icing and smooth. I recently bought a cake smoother and the difference it makes is incredible! This cake is the smoothest I've ever made!

I then left the cake to dry for a few days. I had already started to make some icing penguins using ready to roll fondant icing. Once the heads and bodies were quite dry (I made them separately) I stuck them together using cocktail sticks. I had also previously made some little parcels out of left over icing I had coloured and let them dry out.

So then all that remained was to place all the models on the cake. I put the penguins on first of all, then the presents, but it was still lacking something. Recently I treated myself to a little holly leaf cutter so a friend suggested that I add some holly to the sides. This made it look much more complete!

The final touch was some white, holographic glitter which I sprinkled all over so it looks like snow and frost is sparkling around the penguins. 

Now it's just a case of keeping my fingers crossed that it tastes good!


Friday, 9 December 2011

Fairy cakes


I got an urge to do some coloured icing and cake decoration so I made fairy cakes to take to work. It's years since I last properly made fairy cakes (I have to be honest, they're not my favourite!) and it was great fun! I just used a basic Victoria sponge recipe (4oz caster sugar, 4oz margerine, 4oz self raising flour and 2 eggs) and put it into fairy cake cases. I also added some vanilla bean paste to give them a really good vanilla flavour.

The icing is buttercream - the main reason I don't make fairy cakes very often! I am not a fan of buttercream in general, I find it very sweet and not very tasty. However, it is good for decorating fairy cakes and just because I don't like it doesn't mean that other people don't! I think my team at work will eat anything if it's full of sugar!

In any case, I had great fun colouring the icing and then adding glitter and stars! I have to admit, I left a couple of cakes un-iced so that I could enjoy them too!


Not something I can see myself making very often, but if I get the urge to bake something simple just for a bit of icing fun they are perfect!

Thursday, 8 December 2011

Halloween!

There was no way Halloween could go by without a special cake being made! I made a Devils food cake (as I've posted before, it's such an easy recipe and very tasty). This time, I added icing models I had made.


There's not really a lot more to say about this cake - the cake has been mentioned plenty of times already in other posts. It was yummy, as usual, and the little models were great fun to make :).

Sugar primroses


I have just realised how long ago I last wrote a blog post. I have a backlog of baking to post about now! I may as well get started anyway!

At the cake icing class I've been going to we learned to make sugar primroses. These took a very long time - each flower head needs to be cut out using a primrose cutter, frilled using a cocktail stick (this is when you roll a cocktail stick along the edges of the petals to thin them and make them a bit frilly), bent into shape and attached to a wire. The flowers need to be left to dry (this doesn't take very long if they are made using flower paste). Once you have lots of flowers, each has to be wrapped with florist tape and then eventually all taped together. So they took a long time, but for a first attempt I was pretty pleased with the result.

I then made a Madeira cake so that I could ice it and use the flowers as decoration. Madeira cake is good for making decorative cakes as it is less crumbly than an ordinary sponge cake. It also has a good vanilla flavour which goes well with the jam and icing used to finish it. Unfortunately I can't remember exactly which recipe I used! I googled Madeira cake and after comparing several, just decided to use one of them! They all seemed very similar so I basically chose the one that had the right quantity for the size of tin which I had.


I sliced the cake in half horizontally and put jam in between the two halves, then covered the outside of the cake in jam as well. I coloured some fondant icing pale yellow and used this to cover the cake. The lines are made by a little wheel tool so they are dotted rather than just lines. I added some glitter to add something extra then added the flowers. This cake (as with a lot of the cakes I make) was taken to work. The flowers, however, I have saved!

Friday, 14 October 2011

Time for a steady hand...

I recently started a cake icing class and last week we had to bring royal icing so that we could learn to pipe with it. We made piping bags from greaseproof paper and then were given a choice of designs to pipe. I chose Hello Kitty, partly because she's cute but mostly because it looked like the easiest option. I'm not one to turn down a challenge, but having never tried piping before, and having a slightly shaky hand whenever it should really stay still, even the easiest option was going to be a challenge!


We put the designs on top of a tile or cake board then put a piece of microwavable plastic on top (microwavable meaning it is food safe and thicker than cling film, rather than that it was going to go in the microwave). After that it was time to pipe away. The first job is to pipe the outline and then let it dry. After that, the icing should be watered down slightly and then you 'flood' the different sections of the design, still using the piping bag.

It took a long time. However, the results were better than anticipated - my hand stayed just steady enough. It was difficult, but not so difficult or disastrous that I won't try it again. And somehow it even survived the rain on the way to the car. Now I just have to decide what to do with it...

Wednesday, 12 October 2011

Epic fail!

As I mentioned in my last post, I was going to bake some cakes to take to work once I got back from my course. Well, I did do this - I baked a carrot cake with cream cheese frosting, and a Devil's food cake. The carrot cake went to work and went down a storm. However, my other half (for whom I'd baked the Devil's food cake to take to work) decided he would actually rather keep the chocolate cake at home and eat it himself. Which he did. Although I did get a few pieces so I can't complain!

Anyway, the cakes turned out wonderfully. The epic fail? I forgot to take photos. So this doesn't really make a very interesting blog post - what good is a cake blog post without a picture of the cakes?! So I apologise. However, I have baked since, so watch this space!

Tuesday, 20 September 2011

Devil's food cake


There has been an extreme lack of blogging recently on my part, partly due to a huge lack of time (and a little laziness) but also due to the extreme lack of baking (also due to a huge lack of time and a little laziness). I'm not really sure why, but things have been really busy. I have been doing more sport which I guess has taken up a few extra evenings, so that might explain it. Anyhow, I'm back, and whilst there might not be too much baking going on in the next couple of weeks (for reasons I'll explain later) I have more baking plans now!

So a while back, I made a Devil's food cake. I had found the recipe previously and wanted to give it a go, and at some point I found I had a bit of spare time and felt that a cake would go down quite nicely. The recipe is one of Nigella's and can be found here. It is basically rich, chocolately goodness and is perfect for when chocolate cravings hit.

The cake is lovely and moist, possibly due to the amount of water added to the cake batter. The nice thing is that the ganache is quite bitter, not at all sweet, and so whilst the cake is rich, it is not one of those which leaves you feeling sick at the end (which is what often happens to me if I eat chocolate cake from a coffee shop chain). I only made 2/3 of the quantity of ganache in the recipe, mostly because I only had 200g chocolate, not 300g. However, I found that this was more than enough, and is possibly also another reason that this cake left me feeling satisfied, not ill.

A few weeks later I made another one of these cakes but decorated it more this time. It was a belated birthday celebration cake for my Mum and so I felt that an extra touch was necessary. These stars can be bought in supermarkets or cake supplies shops and against the dark chocolate they look really effective.


I'll definitely be baking another one of these soon, my other half has requested one to take to work!

Due to not having much time this week and to me leaving on Sunday for a course for work, I probably won't get any baking done until the weekend after next. However, after that I have plans!

Thursday, 11 August 2011

Chocolate brownies - maybe even better than my (previous) favourites!


So again, this may not look like much... but this chocolate brownie recipe was amazing! It actually included an icing, but after letting the brownie cool I decided that the icing would probably spoil it. I think it was the right decision as well, as the brownie was delicious just as it was.

The sponge (can you call it 'sponge' if it's brownie?) was gooey and soft, but not too dense or overly rich. This brownie had just the right consistency - gooey and sticky, but a little cakey. The main difference recipe-wise between this and my previous favourite brownies is that this one did not have any chocolate in the batter (just cocoa powder and chocolate chips) and used only caster sugar, instead of a mix of granulated and muscovado sugars. This means that these brownies are less fudgy, but I liked them better as they were less dense and little more cakey (all the time retaining the stickiness and gooey-ness of brownies). The white and milk chocolate chips were the perfect extra.

In the picture above the brownie doesn't look much; as with the last cake I was taking it to work so didn't want to cut it until I got there. The taste more than makes up for it though!

Friday, 8 July 2011

Lemon drizzle cake


Unfortunately this cake is not much to look at, but that's essentially because it is a traybake rather than a cake in the traditional sense. In any case, the taste makes up for its boring look!

I decided to make a lemon drizzle cake as it's my friend Eley's birthday tomorrow, and cake at work on your birthday is a must. I also made some chocolate brownies (new recipe, post to follow!) as Laura who we also work with celebrates her birthday this weekend too, and I wanted to make sure there was enough to go around. I knew Eley likes lemon drizzle cake but as it turned out, this is also Laura's favourite cake so it was a good choice all round!

The recipe was one I'd found in Good Food magazine a while ago and kept as it looked a) simple and b) yummy. My judgement was right on both counts! The recipe is a simple cake, full of lemon zest for flavour (butter, sugar, SR flour, milk, baking powder, eggs and lemon zest) and to make it even tastier, a lemon juice/sugar syrup is poured over the cake whilst it's still warm. It makes the cake moist and gives it a slightly crunchy topping.

This is a definite keeper - yummy, light cake (and dare I say it, a nice change from chocolate!).

Friday, 10 June 2011

Sachertorte - Dad's 60th birthday take 2


So this year my Dad decided to be greedy and have two birthdays. Admittedly it's not every year you turn 60 and it's quite a milestone so really he was entitled to it! Anyway, for his actual birthday I made the fruit cake and we celebrated with my other half and his family, and he decided he wanted a family celebration too for my brother, my brother's girlfriend and my uncle. Plus it was a good excuse for a holiday!

I was asked if I could make a cake and I'm definitely not one to turn down an excuse to bake! I had the perfect cake as well: a Sachertorte. I fell in love with this cake when I lived in Austria and have made it many times since. The recipe is one my family there got from a magazine years ago - the original Sachertorte recipe is top secret. However, this recipe is the best I've ever tasted.

Sachertorte is a chocolate cake with apricot glaze through the middle and under the glaze, and the glaze is a bitter chocolate icing. It is the perfect chocolate cake in my opinion: not at all sweet, very chocolatey and a very balanced flavour. The cake is not too heavy, but at the same time it's dense enough that every bite of cake contains a lot of flavour. It uses plain flour and no baking powder; instead it is the eggs which cause it to rise (it uses six and the whites are whisked separately to make snow)

I have to admit to using ready-made Sachertorte glaze, bought in Austria, rather than making my own. It's so good that I haven't dared try making my own, although now that my supply has run out, I might have to start doing so soon however as I haven't got any trips to Vienna in the pipeline at the moment! The only bit I wasn't very happy with was the writing - I used a white chocolate icing pen and if you leave it for any amount of time, it seeps and widens - it does not hold its shape at all. Next time I'll try making royal icing and piping it on.

This is my favouritest chocolate cake in the world! It disappeared very quickly (my brother would have licked the cake plate clean if I had allowed him to!) and my Dad enjoyed his second 60th birthday!

Sunday, 5 June 2011

The best cookies ever!


Now these cookies might not look anything special, but believe me when I say that they are the best cookies ever! The recipe is based on one from The First Time Cook by Sophie Grigson (the same book that my extremely chocolatey brownies recipe came from). It is another really simple recipe, and the beauty is that you can add whatever you like to the cookie mix. I think the original recipe is for cookies with pecans and dried apricots, but I used chocolate chips. I've also made them with Smarties before and I think those were even better! The basic recipe, however, is the best cookie recipe I've come across.

The cookie dough is simple: butter (I used margarine), sugar, self-raising flour, milk and then whatever you want to add. They bake in 10-14 minutes, and the end result is soft, chewy cookies - exactly how I like them! They keep well for a few days in an airtight container, but the chances of keeping them that long are pretty slim - I can guarantee that given a chance, people will snap up these cookies!

I'm going to try them with cocoa powder in next to see whether I can make good chocolate cookies from the same recipe. Watch this space for the answer!

You can also find the original recipe here.

Saturday, 4 June 2011

Vanilla sponge cake

I'm still catching up on blogging about the baking that I've done over the past couple of weeks, but I'm getting round to it! This is going to be a short post as there's not really a huge amount to say about it. I made a vanilla sponge cake for my other half's cricket match, using the Hummingbird bakery's Cake Days vanilla cupcake recipe. A note on the recipe advised doubling it to make a three tier cake, but thinking that three tiers would be a bit much, I decided to stick to the quantities given for cupcakes. It turned out that this was a very good decision as the cake was the perfect height (this was using two 20cm cake tins).

I adapted the recipe slightly as I used vanilla bean paste instead of vanilla extract - having procured some recently, I wanted to see how much difference it would make.

The answer is that it makes quite a lot of difference. The sponge had a much fuller vanilla flavour. Added to that was vanilla buttercream icing, again made using the vanilla bean paste. That was all topped off with strawberry jam and the result was a lovely, moist, light sponge with lots of flavour. I have to admit that vanilla sponge is not really my thing, nor is buttercream, and I wouldn't have chosen it for myself, but the combination of flavours did work very well.


If you want a simple but impressive cake, this one certainly fits the bill. It is a little sweet, but for those who like their cake that way this is sure to go down a treat! It looks a little plain on top, but I'm always stuck for what to do with vanilla sponge cakes. Any suggestions welcome!

Thursday, 26 May 2011

Extremely chocolatey brownies


I've been quiet for a little while but I'm back to baking again! I had a baking session on Saturday afternoon in order to provide a cricket tea on Sunday, so there'll be a couple more posts to follow after this one.

The first thing I made was chocolate brownies. I have made these so many times but they never fail to impress. The recipe is adapted from the one in The First Time Cook by Sophie Grigson (who is fabulous - this book is well worth a look, even if you're not new to cooking or baking). I chose to add chocolate chips rather than nuts as I don't really like nuts in brownies (and more to the point, neither does my other half!). They are really simple to make and don't require too much preparation.

The recipe is not as heavy on chocolate as you might expect, but it does contain a lot of sugar. It calls for a combination of caster sugar and light muscovado sugar, and it is the latter which helps give the brownies their gooey, dense texture. Not very good for diabetics but an indulgent treat for everyone else!

These brownies will not disappoint - they are rich, dense, gooey and very chocolately. Everything you could want from a brownie!

Sunday, 8 May 2011

Easter Simnel cupcakes


So I'm a little late in posting this - but better late than never! My Granny always used to make a Simnel cake at Easter - a lovely fruit cake, with a layer of marzipan through the middle. Several years ago, knowing my Granny was starting to find it harder to do such things, I asked her for her recipe and said that I would make the Simnel cake that year. To my amazement, my Granny then produced three different recipes and explained that she used a combination of all three, using the ingredients she liked and omitting those she didn't, and sometimes basing the recipe on the ingredients she had in the house.

I looked through the three recipes, tried to decide which bits I liked and which I didn't, and then to come up with a final recipe which contained the right proportions of the different types of ingredients. To my surprise, the cake turned out far better than I had ever hoped and tasted very like the cake my Granny usually made - we were definitely both on the same wavelength!

This year I made caramel cupcakes for Easter and so I didn't make a Simnel cake. Somehow, though, it didn't feel right not having one! With the amount of cake and chocolate we had over Easter, we in no way needed a full-sized cake, so I took inspiration from a recipe I found on the BBC food website and decided to make Simnel cupcakes. I used my own secret recipe though (which I had, thankfully, written down the first time I made it up). I used a quarter of the recipe quantity, which was enough to make four large cupcakes.

For Simnel cupcakes, you fill the muffin cases halfway, then add a disc of marzipan, and then fill the case up with cake mixture. Once the cupcakes have baked and are cool, I added a disc of marzipan to the top as well. I broke with tradition for the cupcakes and instead of decorating the top with marzipan balls, I used a couple of foil-wrapped chocolate eggs and then sprinkled some edible silver stars over the top.


When you cut or bite into the cake, you find a moist, light but rich fruit cake. It's also a little gooey in the centre where the marzipan has cooked into the fruit cake mixture. If I'm honest, the cupcakes were almost a little too large as the fruit cake is quite dense - the recipe I came up with uses a large quantity of fruit. The amount of fruit is what makes the cake so good; it is truly a fruit cake and not a cake which just contains some fruit. I think half a cupcake at a time would have done me though. Maybe next year I'll end up making my full-sized cake, but if not, you can be sure that I'll be making these again!


Friday, 29 April 2011

British jam sponge cupcakes for a very royal wedding day


I have to admit it, I'm really not that interested in the royal wedding. I'm in no way against it; I'm very happy that Prince William and Kate are married and hope that they're very happy together. I'm just not particularly interested in the wedding ceremony of two people I've never met.

That said, people all over the country have been getting excited and preparing for today, planning barbecues, parties, tea parties etc. etc. And I couldn't help but get caught up in it all and thinking that it would actually be pretty good fun to make some themed cupcakes!

The cakes are just a simple vanilla sponge (taken from the Hummingbird book again, I'm obsessed, I admit it). Once they were cold I added a raspberry jam filling - it means that they're almost like mini Victoria sponge cakes, and you can't get much more British than that. Filled cupcakes are definitely my new favourite, as it means that you get the perfect cake/ filling balance. I then added simple vanilla buttercream (buttercream with vanilla extract). This was trickier than I'd anticipated - because I'd cut into the cakes to fill them, there were crumbs which got a bit mixed up with the icing. On top of that, the icing clung to the cake and the spoon, and the top bit of cake covering the jam had a tendency to come off a bit. Still, with a bit of perseverance the icing stuck.

No typically British anything is complete without some blue, red and a Union flag! I used red and blue sugarpaste icing (and some very small cutters) to make the little hearts and stars, and then made the flags by printing them out and attaching them to a cocktail stick. And hey presto! 


Monday, 25 April 2011

Caramel cupcakes


Whilst looking through the new Hummingbird cake book for a recipe for chocolate cupcakes (see my last post) I also came across a recipe for caramel cupcakes and immediately wanted to try them. I had a tin of caramel (dulce de leche) in the cupboard just waiting for such a recipe and I had been desperate to use it for cupcakes. I loved the look of this recipe as it included the caramel in the cake mixture, not just the icing.

I made sure to use muffin cases this time for the batter. However, after filling 12 cases there was still enough batter left over to fill a seven inch tin (which, incidentally, is exactly what I did with it). Still, better too much than too little, I guess!

The cakes turned out pretty well, even though a couple were a little lopsided! That was easily resolved once they were cold though.

I decided not to use the Hummingbird icing recipe as I'm not a huge fan of buttercream icing. I was also keen to keep the sugar content down as far as possible since the caramel itself contains so much, and the recipe for caramel buttercream called for half a kilo of icing sugar. I considered using pure caramel as icing but came to the conclusion that it would probably be too rich. 

In the end I made a very small amount of buttercream (only 30g butter and 100g icing sugar) and then mixed in a few spoonfuls of the caramel. The icing was quite runny but, as with previous attempts at making icing from my own recipes, a little time in the fridge helped. I still ended up with some drips, but I do think the cupcakes look quite cute like that! Some chopped fudge sprinkled over the caramel icing finished the cupcakes off.


For me there wasn't enough icing and the cake to icing ratio wasn't quite balanced. This was because the icing was quite runny (even after the fridge time) and so I couldn't put too much on top of each cake as it would have dripped straight off again. However, I also filled a few of the caramel cupcakes as there was some extra icing. This was the answer! I like filled cupcakes as they are easier to eat than ones with icing piled high, but you still get a good balance of sponge and topping. I think this might be the way forward!


Saturday, 16 April 2011

Chocolate pudding cupcakes


Having bought a new baking book recently - Cake Days by The Hummingbird Bakery - I felt it was time to put it to the test (and it was a good excuse to bake on a free Saturday afternoon). I decided on the Chocolate Fondant Cupcakes, hoping these might have more of a wow factor than the chocolate cupcakes I made recently.

The recipe was quite simple, which is something I hadn't originally expected from a professional baking book - often the recipes are quite long. I decided to halve the recipe, as the full recipe makes 12-16, which is too many for just me and my other half. However, the halved recipe produced more cakes than I expected! I think the cupcake cases I used were shallower than most cupcake cases, which are generally closer to muffin cases. In any case, the extra batter allowed me to try out my new mini silicon cupcake cases (more on that later).

I also decided to try making icing with creme fraiche, simply because I had some left over which needed to be using. Since cream cheese and cream are both used in various types of icing, I figured it must be possible to make some of icing using creme fraiche too. I used 100g creme fraiche, twice as much icing sugar and then added some cocoa powder. It turned out a little runny but I didn't want to add more icing sugar and make it over sweet. As it was, a little time in the fridge sorted it out enough that it was useable and my other half tried it and said he thought it was quite similar to buttercream (I don't think it is, but I did decide it was perfectly fine as icing).

The icing also serves as a filling for these cupcakes. You can fill cupcakes by scooping out a cone shape of cake, dripping some icing into it, then using the top of the scooped-out cone to cover the filling. I did this, then spread some icing on top of the cupcakes. It dripped down the sides a little, but that gave the cupcakes quite a cute look!

The cake is a lovely, moist sponge cake without being too rich and the filling adds that extra something that was missing from the last recipe. The filling makes the cupcakes more like a dessert which is why I called them chocolate pudding cupcakes.


Unfortunately the cakes I made in the silicon cupcake cases didn't turn out so well! The cake itself is perfect, but I filled them a little full and so they spilled over and the cupcakes looked quite misshapen. I don't know whether it's just me, but I wasn't able to turn the cake out of the cases without breaking them either, so they're staying in the cases and will have to be eaten out of them! I'll be sticking to the paper cases, and maybe trying out some larger cases next time - and there definitely will be a next time, these cupcakes are a real treat!

Saturday, 9 April 2011

Cupcake time!

Cupcakes seem to be the thing to bake at the moment and I love looking at all the fabulous different recipes at http://www.cupcakeproject.com/. Finally I decided that since I had a bit of spare time (Saturday morning and my other half was still asleep), and some eggs that needed using up, I would have a go at making some cupcakes. I used a very basic chocolate sponge recipe, which was very easy to make. For once I actually managed to keep the kitchen relatively clean and tidy too - just as well since I had already cleaned it! The brilliant thing about the basic sponge recipe is that it does really just require the one bowl (plus scales and utensils).

The cupcakes turned out reasonably well for a first attempt. In fact there was nothing wrong with them at all - they look nice and taste good. They're just not extra special with some sort of wow factor. However, for a first cupcake basic is probably good and they're certainly quite yummy and edible. They may have been a little more moist if I had taken them out of the oven a few minutes earlier, but no harm done.


For a quick, simple cupcake this is definitely a good recipe. I think next time though I'll try something that's a little different and has some more oomph!

Recipe:

125g butter (or margarine, I find it works just as well normally)
125g caster sugar
2 large eggs
110g self-raising flour
1 heaped tbsp cocoa powder
2 tbsp milk
1 tsp vanilla extract

1. Beat the butter/margarine and caster sugar together until pale and fluffy.

2. Beat in the eggs, adding flour if the mixture curdles

3. Sift in the flour and cocoa powder and fold in.

4. Mix in the milk and vanilla extract.

5. Divide the mixture between 12 cupcake cases. Bake at 190ºC for 15-20 minutes.

I then decorated them with chocolate buttercream icing and dark chocolate curls.

Sunday, 3 April 2011

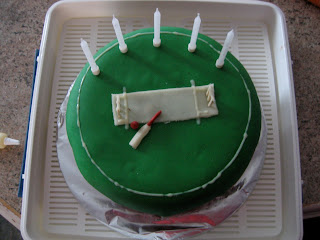
Chocolate Cricket Pitch Cake

March and April seem to be busy months for birthdays in our families and the next one is tomorrow. Since we have to be at work tomorrow, we celebrated today. The birthday, of course, demanded a cake (or to be honest, it was more of an excuse for me to bake). A chocolate cake was decided upon and this presented the perfect opportunity to try out the new ready-to-roll chocolate icing, which I was quite excited about! I was going to add a white icing 'ribbon' to make the cake look like a birthday present but somehow the idea came about to make the top of the cake look like a cricket pitch (I think my other half might have suggested it). The birthday in question was that of my other half's Dad who is quite the cricket fan and so it seemed like a good idea to me. I spent a while trying to decide exactly how to decorate it and this is what I ended up with:


I do realise that it's in no way to scale, but then again, it is a cake! The wicket is made of marzipan, as is the wooden part of the bat. The handle and the ball are made from red sugarpaste icing and the stumps are match sticks. I did consider using candles as stumps but decided that they would be far too big, even for my not-to-scale cake! I then used a small amount of marzipan to make the bails. For the boundary rope and crease markings I used a white chocolate squeezy icing pen.

For the cake itself I used a chocolate cake recipe from BBC Food, http://www.bbc.co.uk/food/recipes/easy_chocolate_cake_31070 though I used buttercream icing instead of the icing recipe suggested here since I was using regalice icing on top. 

The ready-to-roll chocolate icing looked good on the chocolate cake but wasn't as tasty as I'd hoped. It was perfectly fine but I was hoping that it would taste a little more chocolatey than it did. That said, I would still use it again. It gives a nice finish to a chocolate cake and I feel it suits it a little more than any other sort of sugarpaste icing. I think the next step would be to try making my own sugarpaste and see whether I could make it more chocolately.

The chocolate cake itself was extremely easy to make. The recipe produced a very moist and quite rich cake which tasted lovely, but I think eating it straight after dinner was maybe a little too much! My other half declared the cake a success though (and it seemed to go down well in general) so I'll use the recipe again - next time I'll be having it with a cup of tea as an afternoon snack though!


Tuesday, 29 March 2011

Sugar roses

I have been desperate to try making sugar roses for a while but most guides on how to do this involve various tools which I don't have. I decided at the weekend to try making one without any petal cutters or specialist glue with some leftover sugarpaste icing. The icing is white and this isn't the colour I would choose but for test purposes it did the job. I was reasonably happy with the result since it was the first time I'd made a sugar flower, but I will keep trying until I can perfect it. I did come to the conclusion that I need practice, but probably not cutters - you can flatten blobs of icing into the right shape without the need for expensive cutters. Water also sticks them together just fine. What I would like is wire or something similar which they can be stuck on, and a polystyrene block to stick the wires into so that they can be held up to dry. Watch this space for progress!

Thursday, 24 March 2011

Back to my eight-year-old self...

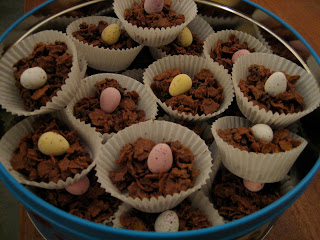
After having a few hectic days at work I decided to make something for my lovely team as we were all in need of something. I had already been planning to make some Easter crispy cakes at some point as there was a large box of cornflakes in the kitchen, so whilst dinner was cooking last night I reverted to my eight-year-old self and made my crispy cakes. It was nice to make something really simple that doesn't require any weighing! And, of course, it brought back memories of making them when I was much younger (including the time when I managed to set a tea towel on fire - don't ask).

Today ended up being just as manic and busy at work. My lovely buddy had also made her excellent banoffee pie which was utterly delicious and got us through the morning. I decided that I would save the crispy cakes for the afternoon and once the lid was taken off mid-afternoon the crispy cakes disappeared pretty much instantly - we were definitely all in need of something chocolatey!

I added raisins into the crispy cakes and put a mini egg on top of each one so that they became Easter nests.


They might be simple and not require any baking talent, but there's something so good about them!

Tuesday, 22 March 2011

Coffee cake #2 (and birthday #3)

On Saturday it was time to make coffee cake number two. The verdict after coffee cake number one was that it was good but that it would nice if the sponge was a little stronger as it was hard to taste the coffee in it (although the icing was very coffee-ish). I therefore made sure to make stronger coffee this time, although not being a coffee drinker the strength was still guess work.

Making the sponge went nice and smoothly again (even working in someone else's kitchen when you're not sure where things are!). The icing, on the other hand, turned out to be too runny. I don't know what it is with me and icing but this is starting to be a regular occurrence! I added more icing sugar to it to make it thicker but when I spread it over the cake it still dripped down the sides! That in itself wasn't so much a problem but it kept on dripping and started forming little pools on the cake board. I put the cake board onto a plate to catch the drips and then put it all in the fridge, hoping that it would help the icing to set. Luckily it did firm up and I was able to make it look a little more respectable!

Once the icing looked presentable I used the same caramel curls as the last time to place around the edge of the cake to create a border. I then used chocolate icing (in a squeezy tube from the supermarket) to write 'Happy birthday' - luckily the chocolate version of this icing is a lot easier to write with than the caramel one!


Coffee cake #2

Sunday, 20 March 2011

Dad's 60th birthday

And here is the finished cake, complete with silver candles. Luckily it also tasted good too and Dad had a great birthday!


Thursday, 17 March 2011

Birthday yumminess

I have a lovely buddy at work who I can always ask for help, and she checks that I'm getting on okay. It was her birthday yesterday so I decided it was only right to make sure that she got a celebratory cake. I asked her beforehand what kind of cake she wanted so that I got it right (after all, there's no point having chocolate cake if you really would have preferred lemon drizzle) and she asked for a carrot cake. She was very specific though and asked for one with raisins but no walnuts.

I found a great recipe but it had walnuts and no raisins. However, after comparing several recipes this still seemed like it would give the best result. Some of the other recipes looked like they would produce delicious cake but they formed loaves and since this was to be a birthday cake, I wanted something that looked more birthday-like. I decided to use the great recipe but to substitute raisins for walnuts and hope it still turned out well!

Tuesday evening after work I got straight down to the cake baking. Baking the carrot cake itself was actually very simple. Aside from the tedious task of grating the carrot, it was quite a quick process as well. Whilst the cake was in the oven I made the cream cheese icing and stuck it in the fridge to keep it chilled until I was ready to ice.

Once the cake was cool I started to ice it, but found that the icing was far too runny (although I had followed a recipe). There was no way it was going to stay put on the cake! I added quite a bit of icing sugar to thicken it and this worked a treat. Once it was the right consistency I started to spread it on top of the cake, but the next problem was that it was lumpy. This wasn't due to the extra icing sugar I had just added, it was the butter. Despite the fact that the butter was soft when it was added to the cream cheese, and despite the fact that I had spent a long time beating it with an electric mixer, the butter had not become smooth. Next time I will simply use margarine. Generally margarine is very good in baking and I am going to go back to my gut instincts and use it! Anyway, to get around the issue of the lumpy icing I sieved it onto the cake. As you can probably imagine, I ended up making quite a mess. Still, I did have nice smooth icing in the end!

Once I had spread the icing over the top and sides and made it smooth, I used a squeezy caramel icing - which you can get from supermarkets - to write a happy birthday message. I then used caramel curls to make a border around the cake, and for a sparkly finish added some of the edible silver stars I mentioned in my last post.

Yesterday there was quite a lot of cake in the office. I love carrot cake and I was worried that this one wouldn't be up to scratch. However, when we finally cut into it - we were trying to stagger them a little so they weren't all eaten at once - it was better than I had hoped. The cake was moist and light but still had that extra density that carrot cake needs. The icing finished it off perfectly (though I was very glad that I hadn't used it in its original runny state) and it disappeared pretty quickly. As a carrot cake fan, even I was impressed! Best of all, my buddy deemed it delicious, and she had a lovely birthday.


Carrot cake with cream cheese icing

Sunday, 13 March 2011

A special occasion

It's my Dad's 60th birthday on Saturday and he had asked for a rich fruit cake for his birthday cake. Luckily the request was made well in advance so I was able to make the cake about six weeks ago and give it time to mature. I don't actually feed my fruit cakes with brandy, I just wrap them up in greaseproof paper and then foil and leave them in the cupboard for six to seven weeks. This started mostly because the first time I made my own Christmas cake I didn't want to buy a bottle of brandy just to put in the cake! The fruit is supposed to be soaked in brandy overnight before the cake is made but I used fruit juice and have done so ever since. I've found that the end result is a delicious, moist, rich cake and so I have stuck to the non-alcoholic version!

As the coming week is going to busy I decided to decorate the cake this weekend. This also gives the marzipan and icing a little time to dry out and harden slightly. Some people say you should marzipan the cake and leave it for a few days before icing it but I often do them both together. I use natural marzipan, rather than the coloured variety, so there's no risk of the icing discolouring. It also means only one session of icing sugar mess on the kitchen side!

I have decorated this cake in a relatively traditional way - marzipan, white icing and then a little decoration. I made the numbers by drawing the shapes on paper, cutting them out and then placing them on top of the rolled icing and using a knife to follow the lines. The stars are edible and, I think, add that little extra special touch. There are so many other decorative techniques I wanted to try here but I decided that keeping it simple was a better idea.


Rich fruit cake


I am going to add a silver ribbon (if I can get hold of one I like) just to finish it off and then on Saturday I'll also add silver candles. I'll add another photo of the completely finished cake next weekend. Then it's just a case of hoping Dad likes it!

Tuesday, 8 March 2011

Coffee cake #1

There's something nice but a little scary about trying out a new cake recipe. I always worry that the new cake won't be as good as any previous ones and wonder whether I should have stuck to a trusted old recipe. This time, however, I had to try out a new one as I had a request for a coffee cake and (not being a coffee drinker) I had never made one before. I decided that I'd better try a test one before the real one was needed and it went down pretty well. After my other half had tried it I took the rest to work where it disappeared quite quickly!

I used proper ground coffee but, due to the aforementioned lack of coffee drinking, I don't own a cafetière or similar. The trick, I found, was to strain the coffee through an old, clean handkerchief. It worked very well and although next time I would make the coffee for the sponge a little stronger, the cake received lovely compliments.


This is a coffee cake with coffee buttercream icing.