
Tuesday, 29 March 2011
Sugar roses
I have been desperate to try making sugar roses for a while but most guides on how to do this involve various tools which I don't have. I decided at the weekend to try making one without any petal cutters or specialist glue with some leftover sugarpaste icing. The icing is white and this isn't the colour I would choose but for test purposes it did the job. I was reasonably happy with the result since it was the first time I'd made a sugar flower, but I will keep trying until I can perfect it. I did come to the conclusion that I need practice, but probably not cutters - you can flatten blobs of icing into the right shape without the need for expensive cutters. Water also sticks them together just fine. What I would like is wire or something similar which they can be stuck on, and a polystyrene block to stick the wires into so that they can be held up to dry. Watch this space for progress!

Thursday, 24 March 2011
Back to my eight-year-old self...
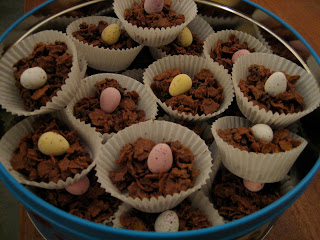
After having a few hectic days at work I decided to make something for my lovely team as we were all in need of something. I had already been planning to make some Easter crispy cakes at some point as there was a large box of cornflakes in the kitchen, so whilst dinner was cooking last night I reverted to my eight-year-old self and made my crispy cakes. It was nice to make something really simple that doesn't require any weighing! And, of course, it brought back memories of making them when I was much younger (including the time when I managed to set a tea towel on fire - don't ask).
Today ended up being just as manic and busy at work. My lovely buddy had also made her excellent banoffee pie which was utterly delicious and got us through the morning. I decided that I would save the crispy cakes for the afternoon and once the lid was taken off mid-afternoon the crispy cakes disappeared pretty much instantly - we were definitely all in need of something chocolatey!
I added raisins into the crispy cakes and put a mini egg on top of each one so that they became Easter nests.

They might be simple and not require any baking talent, but there's something so good about them!
Tuesday, 22 March 2011
Coffee cake #2 (and birthday #3)
On Saturday it was time to make coffee cake number two. The verdict after coffee cake number one was that it was good but that it would nice if the sponge was a little stronger as it was hard to taste the coffee in it (although the icing was very coffee-ish). I therefore made sure to make stronger coffee this time, although not being a coffee drinker the strength was still guess work.

Making the sponge went nice and smoothly again (even working in someone else's kitchen when you're not sure where things are!). The icing, on the other hand, turned out to be too runny. I don't know what it is with me and icing but this is starting to be a regular occurrence! I added more icing sugar to it to make it thicker but when I spread it over the cake it still dripped down the sides! That in itself wasn't so much a problem but it kept on dripping and started forming little pools on the cake board. I put the cake board onto a plate to catch the drips and then put it all in the fridge, hoping that it would help the icing to set. Luckily it did firm up and I was able to make it look a little more respectable!
Once the icing looked presentable I used the same caramel curls as the last time to place around the edge of the cake to create a border. I then used chocolate icing (in a squeezy tube from the supermarket) to write 'Happy birthday' - luckily the chocolate version of this icing is a lot easier to write with than the caramel one!

Coffee cake #2
Sunday, 20 March 2011
Dad's 60th birthday
And here is the finished cake, complete with silver candles. Luckily it also tasted good too and Dad had a great birthday!


Thursday, 17 March 2011
Birthday yumminess
I have a lovely buddy at work who I can always ask for help, and she checks that I'm getting on okay. It was her birthday yesterday so I decided it was only right to make sure that she got a celebratory cake. I asked her beforehand what kind of cake she wanted so that I got it right (after all, there's no point having chocolate cake if you really would have preferred lemon drizzle) and she asked for a carrot cake. She was very specific though and asked for one with raisins but no walnuts.
Tuesday evening after work I got straight down to the cake baking. Baking the carrot cake itself was actually very simple. Aside from the tedious task of grating the carrot, it was quite a quick process as well. Whilst the cake was in the oven I made the cream cheese icing and stuck it in the fridge to keep it chilled until I was ready to ice.
Once the cake was cool I started to ice it, but found that the icing was far too runny (although I had followed a recipe). There was no way it was going to stay put on the cake! I added quite a bit of icing sugar to thicken it and this worked a treat. Once it was the right consistency I started to spread it on top of the cake, but the next problem was that it was lumpy. This wasn't due to the extra icing sugar I had just added, it was the butter. Despite the fact that the butter was soft when it was added to the cream cheese, and despite the fact that I had spent a long time beating it with an electric mixer, the butter had not become smooth. Next time I will simply use margarine. Generally margarine is very good in baking and I am going to go back to my gut instincts and use it! Anyway, to get around the issue of the lumpy icing I sieved it onto the cake. As you can probably imagine, I ended up making quite a mess. Still, I did have nice smooth icing in the end!
Once I had spread the icing over the top and sides and made it smooth, I used a squeezy caramel icing - which you can get from supermarkets - to write a happy birthday message. I then used caramel curls to make a border around the cake, and for a sparkly finish added some of the edible silver stars I mentioned in my last post.
Yesterday there was quite a lot of cake in the office. I love carrot cake and I was worried that this one wouldn't be up to scratch. However, when we finally cut into it - we were trying to stagger them a little so they weren't all eaten at once - it was better than I had hoped. The cake was moist and light but still had that extra density that carrot cake needs. The icing finished it off perfectly (though I was very glad that I hadn't used it in its original runny state) and it disappeared pretty quickly. As a carrot cake fan, even I was impressed! Best of all, my buddy deemed it delicious, and she had a lovely birthday.

Carrot cake with cream cheese icing
Sunday, 13 March 2011
A special occasion
It's my Dad's 60th birthday on Saturday and he had asked for a rich fruit cake for his birthday cake. Luckily the request was made well in advance so I was able to make the cake about six weeks ago and give it time to mature. I don't actually feed my fruit cakes with brandy, I just wrap them up in greaseproof paper and then foil and leave them in the cupboard for six to seven weeks. This started mostly because the first time I made my own Christmas cake I didn't want to buy a bottle of brandy just to put in the cake! The fruit is supposed to be soaked in brandy overnight before the cake is made but I used fruit juice and have done so ever since. I've found that the end result is a delicious, moist, rich cake and so I have stuck to the non-alcoholic version!
As the coming week is going to busy I decided to decorate the cake this weekend. This also gives the marzipan and icing a little time to dry out and harden slightly. Some people say you should marzipan the cake and leave it for a few days before icing it but I often do them both together. I use natural marzipan, rather than the coloured variety, so there's no risk of the icing discolouring. It also means only one session of icing sugar mess on the kitchen side!
I have decorated this cake in a relatively traditional way - marzipan, white icing and then a little decoration. I made the numbers by drawing the shapes on paper, cutting them out and then placing them on top of the rolled icing and using a knife to follow the lines. The stars are edible and, I think, add that little extra special touch. There are so many other decorative techniques I wanted to try here but I decided that keeping it simple was a better idea.

Rich fruit cake
I am going to add a silver ribbon (if I can get hold of one I like) just to finish it off and then on Saturday I'll also add silver candles. I'll add another photo of the completely finished cake next weekend. Then it's just a case of hoping Dad likes it!
Tuesday, 8 March 2011
Coffee cake #1
There's something nice but a little scary about trying out a new cake recipe. I always worry that the new cake won't be as good as any previous ones and wonder whether I should have stuck to a trusted old recipe. This time, however, I had to try out a new one as I had a request for a coffee cake and (not being a coffee drinker) I had never made one before. I decided that I'd better try a test one before the real one was needed and it went down pretty well. After my other half had tried it I took the rest to work where it disappeared quite quickly!
I used proper ground coffee but, due to the aforementioned lack of coffee drinking, I don't own a cafetière or similar. The trick, I found, was to strain the coffee through an old, clean handkerchief. It worked very well and although next time I would make the coffee for the sponge a little stronger, the cake received lovely compliments.

I used proper ground coffee but, due to the aforementioned lack of coffee drinking, I don't own a cafetière or similar. The trick, I found, was to strain the coffee through an old, clean handkerchief. It worked very well and although next time I would make the coffee for the sponge a little stronger, the cake received lovely compliments.

This is a coffee cake with coffee buttercream icing.
Subscribe to:
Posts (Atom)